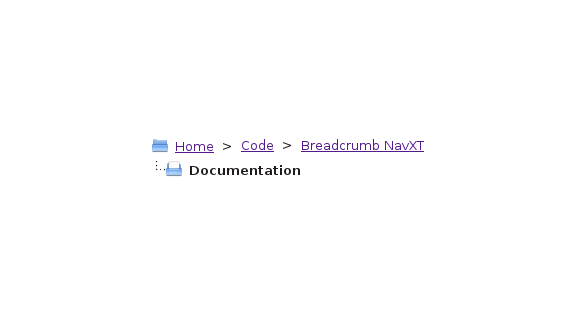
vBulletin is a somewhat popular forum software package that has a unique breadcrumb design. Rather than the normal, single lined breadcrumb trail, it drops the current item’s breadcrumb to a second line. It also happen to have two folder icons for flair, but those are trivial to add in with CSS3. Even without CSS3 adding the icons is fairly easy (set as a non-repeating background image).
The Markup
For this example, it was easier to have the breadcrumbs wrapped in <li> tags. For Breadcrumb NavXT this is easiest to do using the bcn_display_list() function (note that in versions other than 4.3.0 you can use the breadcrumb templates to add <li> tags). This produces the example markup:
<ul class="breadcrumbs">
	<!-- Breadcrumb NavXT 4.3.0 -->
	<li><a title="Go to the home page." href="http://mtekk.us" class="site-home">Home</a></li>
	<li><a title="Go to Code." href="http://mtekk.us/code/" class="page">Code</a></li>
	<li><a title="Go to Breadcrumb NavXT." href="http://mtekk.us/code/breadcrumb-navxt/" class="page">Breadcrumb NavXT</a></li>
	<li><span class="post-page current-item">Documentation</span></li>
</ul>
To get Breadcrumb NavXT to generate that for you, use the following as your calling code:
<ul class="breadcrumbs">
<?php if(function_exists('bcn_display_list'))
{
	bcn_display_list();
}?>
</ul>
The Styling
The markup is easy to generate, Breadcrumb NavXT takes care of that for us. As always, this CSS needs to be placed in the appropriate location for your theme (typically style.css). As for the styling we need to do the following:
- Float the elements so they don’t look like a list
- Remove the list bullets/bubbles
- Drop the last element to the next line
- Add separators between the elements on the top row
- Add the two icons
Let’s begin with 1 and 2:
.breadcrumbs{
	float: left;
	font-size: .8em;
}
.breadcrumbs li{
	float: left;
	list-style: none outside none;
	display: inline-block;
	margin: 0;
	padding: 1px 8px;
}
This code removes the list styling (list bullet points), floats the list elements so they are on a single line, and adds some padding for spacing the elements out visually. Now, let’s move the current item to it’s own line.
.breadcrumbs li:last-child{clear: both}
This CSS drops the last element, our current item breadcrumb, down to it’s own line. Next up, let’s add in our separators.
.breadcrumbs li:nth-last-child(n+3):after{
	content:">";
	position:relative;
	z-index:100000;
	left:8px;
	top:0px;
}
This code adds in a separator between all of the breadcrumbs on the top row. We use the n+3 offset so that the second to last and last element don’t have the separator. Finally, let’s add those icons.
.breadcrumbs li:nth-child(1):before{
	content:url('navbits_start.png');
	position:relative;
	z-index:100000;
	left:-7px;
	top:2px;
}
.breadcrumbs li:nth-child(n+2){
	padding-top: 4px;
}
.breadcrumbs li:last-child:before{
	content:url('navbits_finallink_ltr.png');
	position:relative;
	z-index:100000;
	left:-7px;
	top:2px;
}
The first block adds the open folder icon before the first breadcrumb. The third block adds the open folder with document icon before the current item breadcrumb.
With the above CSS we can closely mimic the style of the vBulletin breadcrumb trail. Further tweaks will result in an even closer match, but that is an exercise left to the reader.
-John Havlik
[end of transmission, stay tuned]

I had no idea that your plugin could ‘do’ vBulletin style nav. Very cool!
Yeah, this was the result of someone claiming that the plugin couldn’t do it. The primary claim was that they needed to be able to add the images manually, even though I suggested that there was a way to do it just with CSS. Rather than sit and argue, I decided to present an implementation.
-John Havlik
Thanks for this tutorial John. I’m sorry if I was rude at all. I was just wanting my website to have the same breadcrumb throughout the whole site. I must admit though that I’ve never really used CSS3 before though.
No problem, I had the general idea of how to do it in mind when you asked. But, I haven’t played with CSS in a while so I didn’t have code to just point you to (As far as I know, this is the first CSS3 I’ve written). The tutorial took more time to put together than the actual code (no surprises there).
-John Havlik