After assembling my new home server, I ran into a bit of a heat issue. The Xeon-D SOC would get quite hot under load (80C), and was a little warmer than desired while idling (40C). Attempting to cool itself off, the motherboard kept the chassis fans spinning fast enough to be annoyingly loud. Since the heatsink installed on the motherboard was designed for 1U compatibility, and the case I’m using is 2U tall, it was not getting the airflow it was designed for.
Initially, the plan was to create an air duct to direct one of the 80mm chassis fans onto the heatsink. However, after a little perusing, I found an forum topic on heatsink options for the Supermicro Xeon D boards. One of the forum members found that the Cool Jag BUF-E Core, a 2U copper heatsink fits the hole pattern for the Supermicro Xeon D boards.
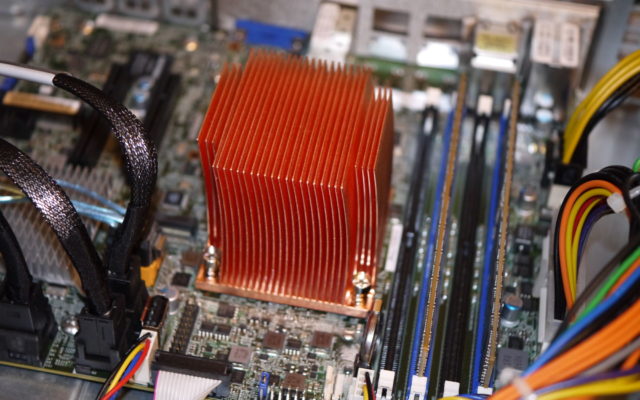
The Cool Jag BUF-E Core


This 2U tall copper heatsink weighs in at a whopping 0.5Kg (~1.1lbs). More importantly, it is readily available online through ’boutique’ sellers. And, at ~33USD, it is reasonably priced.
Installation


While the BUF-E comes with its own mounting hardware, the threading on the bolts does not match the X10SDV-7TP4F’s stock backing plate. Rather than trying to remove the backing plate, a mounting bolt swap was performed. The BUF-E uses rubber o-rings for retaining the mounting bolt-spring assembly in the heatsink. Using the edge of X-Acto blade, or a miniature screwdriver, these o-rings can be slipped out of their retaining grove and removed.


Once the original mounting hardware was removed, it was time to remove the thermal pad. Arctic Silver’s ArtiClean “1” had no problems eating away at the thermal pad. After the pad was removed, two alignment corners for the pad were visible. Unfortunately, Cool Jag has milled these into the surface, and they are relatively deep.


Next was removing the X10SDV-7TP4F’s stock heatsink. Since the thermal pad that Supermicro uses is quite viscous, this works best if the heatsink is warm. Just loosen all four mounting bolts until they no longer contact the backing plate and twist the heatsink. Note, it may be a good idea to remove any installed RAM before doing this—it goes without saying, this should not be done while the board still has power.


Since I wanted to reuse the stock heatsink’s mounting hardware on the BUF-E, I needed to remove it from the stock heatsink. Unlike the BUF-E, the stock cooler used a retaining clip for its mounting bolt-spring assembly. These can be removed with a needle-nose pliers.


Now, to install the stock hardware on the BUF-E. The same needle-nose pliers can be used to re-install the retaining clips. Since the BUF-E’s base is over 1mm thicker than the stock heatsink, the 0.6mm plastic spacer washer used on the stock heatsink hardware was not used. The goal was to try to maintain close to the same force on the SOC as the stock heatsink.


After applying some thermal paste (Arctic Alumina), and applying a tint coat on the heatsink to fill the milled alignment corners, the BUF-E was installed. All four bolts lined up with the stock backing plate, and secured the BUF-E as expected.
Results
As a completely unscientific test, I re-compiled Samba 4.5.4 after installing the BUF-E. The core temperature for the Xeon-D peaked at 54C. This is an impressive improvement from the 80C seen before with the stock heatsink.


Using a thermal camera to get a general sense of the hot spots on the X10SDV-7TP4F, it is apparent that the Xeon-D is no longer the hottest item on the board. That distinction now goes to the LSI 2116. Upgrading the LSW2116’s heatsink will be a little more difficult. It ships with a very low profile heatsink to prevent interference with any installed PCIe cards that overhang the PCIe slots.
Conclusion
The Cool Jag BUF-E Core is an excellent upgrade to Supermicro’s Xeon-D motherboards when there is room for a 2U cooler. It outperforms the stock thermal solution in 2U chassis, it is relatively inexpensive, and it can use the stock thermal solution’s mounting hardware.
-John Havlik
[end of transmission, stay tuned]
Did you ever end up doing anything with the LSI 2116 SAS2 heatsink?
While my CPU seems to be down around 40C, my SAS2 chip is idling around 98C without a fan. I set a 50mm fan on top with a low-noise adapater and that dropped my SAS2 chip temps down to around 50, which I consider more than acceptable.
I just haven’t found a good method of securing any kind of fan to the heatsink. If you’ve found anything, I’d be more than interested.
Hi Mike,
As a temporary solution, I ended up using fishing line to attach a 40mm Noctua fan to the LSI 2116 heatsink. Like you found, it brings the temperature down to under 50C, which is enough to keep my case fans from spinning up too high. Ideally, I’d remove the heatsink and make something bigger fit. However, that requires removing the motherboard from the chassis (something I don’t want to do right now).
-John Havlik