OpenVPN Tips And Tricks

Setting up your own VPN server and getting everything working can be a real pain to do. Over the past few months I’ve been off and on trying to get one working. While I had attempted to get other methods, which did not require software to be installed in Windows, to work, I ended up settling on using OpenVPN. Here are a few notes and resources I found useful.

Gentoo Forums :: View topic – Howto Openvpn – The quick easy wayhttp://forums.gentoo.org/viewtopic-t-117709-view-next.htmlI’ve read through a lot of howto’s for openvpn, and a lot of them didn’t seem to work, I could follow them line for line and I kept running into problems. Here is my HOWTO on openvpn, which i find was the simpliest way of setting it up.

I used the above guide to begin my setup of a OpenVPN server on my server running Funtoo (a Gentoo variant). While the guide is pretty good, I have a few notes:

  • The line remote <vpn server ip> 9900 for the Linux client config is wrong, in the example configs the port should always be 9000
  • Since the writing of the guide, easy-rsa has been split off into it’s own package, install it by running emerge -av easy-rsa
  • The directory the easy-rsa files go to has changed, they are now located under /usr/share/easy-rsa/ you will want to copy these somewhere else (e.g. /etc/openvpn/easy-rsa) to prevent them from being overwritten when updating easy-rsa
  • Easy-rsa contains several OpenSSL config files, you’ll either need to update the server.cnf file to match the installed OpenSSL version, or create a symlink with openssl.cnf pointing to the appropriate openssl-.cnf file.
  • If you do not have $OPENSSL defined, you’ll run into issues running ./build-dh. You should be able to edit line 7 of build-dh replacing $OPENSSL with openssl

Beyond this guide, when trying to talk to a Samba server, a few things should be noted:

  • When using a VPN to connect to a network with the Samba server, you will have a IP address in a different network than the Samba server is in (e.g. 192.168.2.0 vs 192.168.10.0). Make sure to add your VPN network to the hosts allow property in your smb.conf.
  • Since Windows Vista, Windows tries to find a gateway to determine if the connected network is a home, office, or public network. You may need to add push "route 0.0.0.0 0.0.0.0 vpn_gateway 999" to your OpenVPN server’s config file.
  • If you want to use the Netbios name to access the Samba server, you will want to place push "dhcp-option WINS <SAMBA_IP_ADDRESS>" (where <SAMBA_IP_ADDRESS> is the IP address of your Samba server) in your OpenVPN server’s config file.

Lastly, you should note that if the network you are VPNing into has a server at the same IP address as the network you are VPNing from, it may be difficult to contact the server on the network you have VPNed into. So, it is probably a good time to move away from using 10.0.0.0, 172.16.0.0, or 192.168.1.0 as your network address.

-John Havlik

[end of transmission, stay tuned]

Think Tank Mirrorless Mover 20

Ever since getting the Panasonic Lumix GF5, I have been looking for a good camera bag for it and a few lenses. While on some trips I can get away with just the 20mm prime, there are cases when I want a zoom lens or a macro in addition. After a little searching, and asking the opinions of others, I ended up buying the Think Tank Mirrorless Mover 20.

Of the various options available for a mirrorless camera, the one thing that really makes the Think Tank stand out is the rain cover. While the bag is a little spendy compared to the other options out there, the extra cost can be felt in the product. It’s one of the more solidly built bag/backpack that I’ve purchased in a long time.

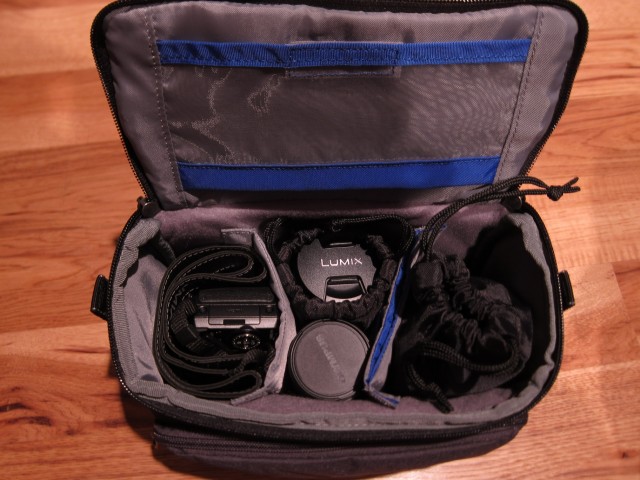
Size wise the Think Tank Mirrorless Mover 20 is about the size of an average soft ‘lunch pail’. I was able to fit my GF5+20mm, 60mm macro, 14-42mm (kit lens), and 45-175 telephoto into the Mirrorless Mover 20. I don’t see my self carrying more than that lens wise (only really missing a nice wide angle lens). Above is a picture of the lenses and camera in the Mirrorless Mover 20. The only thing I wasn’t able to fit in the Mirrorless Mover 20 was my Joby GorillaPod with the three extra lenses, remove one and it fits perfectly. Honestly, a little more efficient packing on my part would allow the GorillaPod to ride along too.

-John Havlik

[end of transmission, stay tuned]

IdeaPad s405

As mentioned previously, I am looking for a new laptop. The closest to ideal new laptop will likely be a Dell XPS 14 ultrabook when the series is refreshed with Haswell core processors. However, those are not available yet. Before heading off to WordCamp Chicago this year, I decided I would not be lugging the Vostro 1400 with me. Since Lenovo was running some pretty good outlet deals, I picked up the ideapad s405 for pretty cheap. Yes, this laptop only meets the first two requirements I set forth in “What I Look for in a Laptop”.

The Hardware

The s405 is an “entry level”/”value” segment ultrabook class laptop. However, it can’t qualify as an ultrabook as it has an AMD APU rather than Intel CPU.

  • AMD A6-4455M APU (2.1GHz, 2.6GHz turbo) 17W with HD 7500G
  • 8GiB 1.35v DDR3-1333 single channel (upgrade, more on this later)
  • 256GB Samsung 840 Pro (upgrade)
  • 802.11bgn (Ralink RT3090 based)
  • 32 Wh Li-ion battery (up to 5hrs according to Lenovo)
  • 14 inch glossy display (1366 x 768)
  • AMD Radeon HD 7500G Graphics (256 shaders, 327MHz, 424MHz turbo)

The build quality is adequate. It’s not build like a tank, unlike the Vostro 1400, but then again it is much lighter and thinner. It does flex a little when opening the lid, and will flex a little if held from either front corner.

Like a few other ultrabooks, rather than facing up at you, the speakers face down towards the surface the s405 is sitting on. This works quite well in delivering adequate sound for such a small device. This scheme delivers at least 10X better sound than that from the Vostro 1400.

Performance wise, while the A6-4455M is slower than the C2D x9000 in the Vostro 1400, it is fast enough for day to day tasks. It has no problem streaming 1080p H.264 video over WiFi (something that can’t be said about some Pentium mobile chips from only two years ago). It took about a weekend to get Funtoo up and running (with KDE4 and fglrx working), which is about right when dealing with unfamiliar hardware.

Caveat Emptor

Unlike the Vostro 1400, the s405 does not have individual compartments for accessing and upgrading components. Instead the bottom of the laptop must be removed (there are screws hidden under the rubber feet), which while not difficult is a bit of a pain when diagnosing hardware issues.

While the memory is upgradeable, not all memory is compatible. Worst of all, memory may pass several rounds of checks on memtest86 and Microsoft’s memory tester and still cause issues in the OS. Case in point, just before heading off to WordCamp Chicago I had installed a 8GiB stick of 1.35v DDR3-1600 CL11 memory (Patriot branded stick with Micron chips). While in Chicago the laptop would BSoD anywhere between 5 and 55 minutes of use (I ran Windows 8.1 while down there which isn’t a bad OS).

After returning from Chicago, I narrowed down the issue to being with the memory (replacing it with the stock memory resolved the BSoD issues). While 4GiB is probably enough memory for this laptop, I wanted more for running VMs (with Vagrant) and using for RAMdisks when compiling. Crucial happens to have 8GiB sticks of 1.35v DDR3-1333 CL9 memory that they guarantee compatibility with the s405. Thus far, it appears that the guaranteed compatible memory from Crucial is in fact compatible with the s405 (have not had any issues with it).

The s405 only supports 7mm high drives. The included 500GB WD Scorpio Blue is very slow, so it was replaced with the only 7mm drive I had on hand (a Samsung 840 pro that was supposed to go into my workstation).

Finally, for those who do not know, Lenovo (like IBM before them and HP) have device white-lists for WiFi cards. So upgrading the card in this laptop may not be easily done (will update when I have an extra mini-pcie WiFi card on hand to test).

Other Thoughts

Battery life, while more is better, and this laptop could use more, is not too bad. While waiting for my delayed flight back from WordCamp Chicago, I was able to run the s405 for 3 hours while playing music off of a SD card and writing some code and documents. This only brought the battery down to 50% (according to Windows 8.1), while I don’t think 6 hours will be the typical battery life, it should be possible.

The trackpad is nice and large, but frankly I do not like trackpads. Within Windows the Synaptics drivers do a good job at palm detection and prevent the cursor from jumping to random areas when typing. In Linux, the Synaptics drivers are pretty good, but require calibration/configuration tweaking to get the palm detection working properly.

-John Havlik

[end of transmission, stay tuned]

Breadcrumb NavXT 4.4.0

Holy API improvements Batman! As with 4.3.0, this release contains several smaller improvements rather than a single, or handful of ‘block buster’ new features. The largest set of these improvements is the addition, and improvement of several filters within Breadcrumb NavXT.

Of the new filters, bcn_template_tags has one of the larger impacts. It allows the addition of custom breadcrumb template tags. Other new filters include bcn_allowed_html, bcn_breadcrumb_template, and bcn_breadcrumb_url. For more information on these filters, please checkout the Breadcrumb NavXT Filters section of the documentation.

Additionally, the set of valid HTML for breadcrumb templates was revised and expanded. The basic set should now include a, img, span, h1, and h2 HTML tags. Added valid properties include:

  • aria-hidden
  • data-icon
  • itemprop
  • itemscope
  • itemtype

With the bcn_allowed_html filter the list of valid HTML tags and associated properties can be expanded upon without modification of the plugin.

The Translation Team:

[glot-translators=breadcrumb-navxt]

As always, you can grab the latest version of Breadcrumb NavXT from the Breadcrumb NavXT page. If you experience any issues with this version of Breadcrumb NavXT, please leave a comment on this post detailing the issue.

-John Havlik

[end of transmission, stay tuned]
How to Add li and Other Tags to Breadcrumb Templates

Since Breadcrumb NavXT 4.3.0, all settings that can contain HTML are passed through wp_kses(). With this change, only a basic set of acceptable tags and properties within tags were allowed. Naturally, this restricted users more than they were used to. The restriction wasn’t the biggest problem, the lack of a filter to allow users to add their own tags in to the allowed HTML tag list. However, with Breadcrumb NavXT 4.4, a new filter bcn_allowed_html has been introduced to fix this issue.

The default set of allowed HTML tags in Breadcrumb NavXT 4.4 consists of: <a>, <img>, <span>, <h1>, and <h2>. For the purposes of this guide, let’s assume you don’t want to use the built in bcn_display_list() function to output breadcrumbs wrapped in <li> tags. The reason you would want to do this is if you need additional properties within the tag (Breadcrumb NavXT will by default add a class but that’s it).

In Breadcrumb NavXT 4.4, adding a tag to the allowed HTML list for Breadcrumb NavXT is really easy. Just create a function with one input argument ($allowed_html in this example). Within that function append, using the HTML tag name as the array entry key, assign an array of properties that tag is allowed to have, using the property name as the array entry key and a value of true. Then add your filter function to the ‘bcn_allowed_html’ filter hook. Below is an example of this for the <li> tag with a selection of properties.

function my_bcn_allowed_html($allowed_html)
{
	$allowed_html['li'] = array(
		'title' => true,
		'class' => true,
		'id' => true,
		'dir' => true,
		'align' => true,
		'lang' => true,
		'xml:lang' => true,
		'aria-hidden' => true,
		'data-icon' => true,
		'itemref' => true,
		'itemid' => true,
		'itemprop' => true,
		'itemscope' => true,
		'itemtype' => true
	);
	return $allowed_html;
}
add_filter('bcn_allowed_html', 'my_bcn_allowed_html');

To get started quickly, just copy and paste the above code into a site specific plugin and start playing.

-John Havlik

[end of transmission, stay tuned]