Intel Arc A380 as a Plex Media Server Transcoding Accelerator on Linux

Previously, if one wanted hardware accelerated transcoding in one’s Plex Media Server, the options were to either use a Nvidia card, or use an Intel CPU with QuickSync (and a platform that enables the iGPU). With Intel releasing the Arc series of GPUs, a 3rd option emerged. Recently, low profile variants of both the Arc A380 and Arc A310 have become widely available, presenting a low cost, low power, and easy to fit hardware transcoding option. On the software side, not much is needed to get hardware accelerated transcoding working with the Arc A380/A310.

Drivers

First up, you will need the Intel graphics drivers in your kernel. Check your distro’s guides for how to do this (Gentoo has a fairly good wiki entry on this). One item to note, the choice of whether to compile the driver as a module or include it in the kernel depends on your setup. A general rule of thumb that has worked for me: if you use an initramfs, compile the DRM_I915 driver as a module; if you use efistub as your bootloader, build the driver into your kernel and include the firmware into the kernel image.

If you need to include the firmware into the kernel image (building the DRM_I915 driver into the kernel instead of as a module), you will need to install the linux-firmware package before compiling your kernel. Under the firmware loader settings, you’ll need to include the following firmware blobs: the dg2_dmc, dg2_guc, and dg2_huc. As of Linux 6.4.13 these are the versions the i915 driver will want: i915/dg2_dmc_ver2_08.bin i915/dg2_guc_70.bin i915/dg2_huc_gsc.bin

Userland
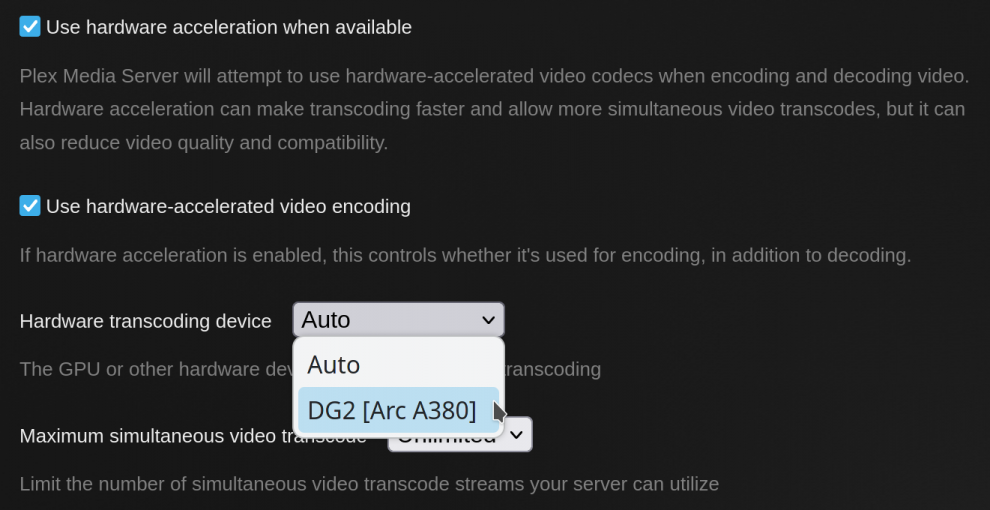
After rebooting with the new kernel, within the Plex Settings, under the Transcoding section, enabling hardware acceleration should be available. Additionally, the Arc A380/A310 should show up in the Hardware transcoding device dropdown. Make sure both “Use hardware acceleration when available” and “Use hardware-accelerated video encoding” are checked. For the “Hardware transcoding device” option, if you have other GPUs, you may want to select the Arc device so it is targeted. Don’t forget to press the “Save Changes” button.
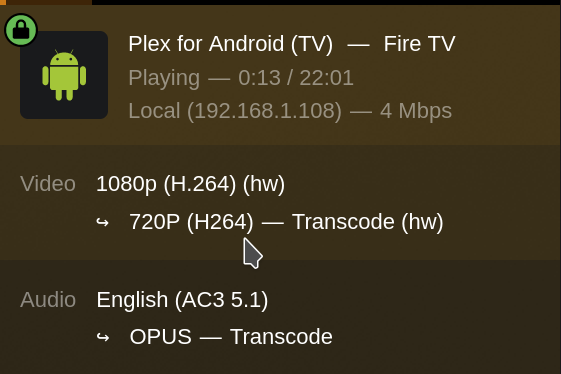
While Plex is now finding the device, it still may not be able to use it just yet. If libva isn’t installed, Plex will not be able to use the Arc GPU for transcoding. For funtoo users, ensure that your profile has the gfxcard-intel mix-in and then install libva. At this point, hardware transcoding should work. You can double check this by using intel_gpu_top while playing a video. Another method of checking if hardware transcoding is working is through the “Now Playing” section of the Plex dashboard. If you see a (hw) next to the codec and the word Transcode in the video section, hardware transcoding is working.

Note that getting hardware transcoding working with Plex Media Server only required the Intel graphics Linux kernel driver, some firmware blobs, and libva. X server, Wayland, a window manager, and desktop environment were not needed or installed.

-John Havlik

Fixing the ‘btrfs block device size is smaller than total_bytes in device item’ Error

Recently, I ran into a problem with an old SSD formatted with btrfs. The filesystem refused to mount. Checking dmesg I had an error stating that "the device total_bytes should be at most NUMBER1 but found NUBMER2", where NUMBER1 is less than NUMBER2.

The solution is to use the relatively new fix-device-size feature in btrfs rescue. This was added sometime after 2022, likely in Linux 6.3 (the patch to add this feature was submitted in the kernel developer mailing list in mid-2022). At the moment, I can confirm that 6.4.13 has this feature. Syntax wise, the command is:

btrfs rescue fix-device-size <device>

Just replace <device> with the /dev/ path to the device you are having issues mounting due to the size missmatch. This should work for most cases where the total_bytes for the device is only ‘slightly’ larger than the actual device size.

-John Havlik

Notes on LUKS + EFISTUB

Running off of an encrypted root filesystem has been one of those things that never seemed to float to the top of the todo list. However, back in December (2018, this article lived in the drafts bin for quite some time), it finally made it to the top of the todo list. At the time, one was preparing the Dell XPS 15 9550 to replace the Ideapad s405 for travel. Encrypting everything seemed prudent for a travel laptop.

As of the writing of this article, LUKS is the standard way of encrypting a filesystem in Linux. Generally, a boot loader is used to kick off an initramfs which loads the basics (need LVM, dm-crypt, and LUKS) and prompts for the passphrase for decrypting the root filesystem. If you’re fine with running a boot loader, most guides will get you going with LUKS quite quickly.

However, running a full boot loader on UEFI systems feels archaic. There is just something about using the kernel’s built-in EFISTUB that feels more elegant. And, this is where things divert from the bog-standard path. Typically, when using the EFISTUB, one does not bother with an initramfs (compile the kernel for you known hardware set and you’re good to go). However, an initramfs is integral to having an encrypted root partition.

initramfs Woes

The first problem started with trying to get a working initramfs. Since one had not used an initramfs with EFISTUB previously, there were a few hurdles to overcome. Initially, one tried to use an external initramfs. However, the 9550 does not allow/pass UEFI parameters nicely, and using the built-in kernel command line to specify an external initrfamfs in the EFI boot partition did not work. So, the initramfs needs to be built into the kernel for the XPS15 9550. This lead to a second problem.

Initially, the initramfs that genkernel builds was tried. Unfortunately, it appears this is (as of late 2018) broken/not-suitable for situations where the initramfs needs to be bundled into the kernel. Luckily, betterinitramfs can be bundled into the kernel.

Naturally, there is one gotcha to keep in mind regarding betterinitramfs. As distributed, betterinitramfs does not populate /dev/disk/by-uuid et al. as it does not provide udev (or eudev). The end result is real root needs to be specified using /dev/BLOCKDEVICENAME rather than using PARTUUID.

Conclusion

While the setup of using EFISTUB with an LUKS encrypted root partition is a little esoteric, it is possible to get working. There are a bunch of UEFI related pitfalls waiting to snare you—different platforms will have a different mix of issues. Then again, all UEFI systems should be able to use the initramfs embedded in the kernel when using the EFISTUB boot loader. Regardless, this path is not advised for those learning about/using LUKS for the first time.

-John Havlik

U2F and Firefox on Funtoo

U2F is pretty neat. It can be used locally on a machine for authentication and for two factor authentication on websites. There are even plugins for using it on WordPress powered websites. At the time this article was written, Firefox does not enable U2F by default. Though, that looks to be changing with Firefox 68.

Enable U2F in Firefox

Enabling U2F in Firefox is fairly straightforward. In the URL bar enter: about:config. Then search for u2f. There should be an entry: security.webauth.u2f, set it to true.

Install pam_u2f

However, simply enabling U2F in Firefox is not enough for a U2F device to work. To get everything working, pam_u2f needs to be installed. On Funtoo, this is quite simple:

emerge -av pam_u2f

After installing pam_u2f, Firefox should now be able to query your U2F key.

XDM/SDDM Slow Startup Followup

As reference previously, recently, the XPS 15 9530 had an issue in startup where the login prompt in the shell was available but XDM/SDDM did not start until several key presses later. Waiting for it to start was a futile effort—once waited over 30 minutes to no avail. A full system reinstall did not help either.

Digging into the dmesg output revealed something interesting:

[83.413293] random: crng init done
[83.413299] random: 7 urandom warning(s) missed due to ratelimiting

It was taking over a minute and a half for random to generate enough entropy. And, this was with the keyboard getting mashed! Apparently, this is a relatively common issue to run into.

Since the XPS 15 9530 has a Haswell core CPU with RDRAND instruction support, an easy way around this is to enable “Trust CPU Vendor” in the kernel config:

CONFIG_RANDOM_TRUST_CPU=y

Now, this is not without consequence. There is concern that Intel’s RDRAND implementation was inappropriately influenced by external parties. An alternative workaround is to install haveged. This has its own issues—it is a software solution to inflate entropy. Finally, on the Gentoo forums, the recommendation is to continue to mash the keyboard until userland applications are updated with to more appropriate entropy requirements.

Tagged:
Updated: